看完上篇 [手把手教學文] 三分鐘在 GCE 上部署 Container 若激起你興趣的話,就快來看看如何用 Container 將電商、媒體、網站等業者愛不釋手的搜尋系統 Elasticsearch 打包部署在 GCE 上!
Contact Us
Proven Experience Across Diverse Industries
[ 手把手教學 ] 用 Container 安裝 Elasticsearch 實戰篇

看完上篇 [手把手教學文] 三分鐘在 GCE 上部署 Container 若激起你興趣的話,就快來看看如何用 Container 將電商、媒體、網站等業者愛不釋手的搜尋系統 Elasticsearch 打包部署在 GCE 上!
因為不需要 X-Pack plugin,所以在 Dockerfile 內將其移除
$ cat >> Dockerfile << EOF
FROM docker.elastic.co/elasticsearch/elasticsearch:5.6.5
ADD elasticsearch.yml /usr/share/elasticsearch/config/
RUN bin/elasticsearch-plugin remove x-pack --purge
USER root
RUN chown elasticsearch:elasticsearch config/elasticsearch.yml
USER elasticsearch
EOF
因為需要從外部連線至 Elasticsearch,所以需要在 elasticsearch.yml 內設定 network.host
$ cat >> elasticsearch.yml << EOF
# ======================== Elasticsearch Configuration =========================
#
# NOTE: Elasticsearch comes with reasonable defaults for most settings.
# Before you set out to tweak and tune the configuration, make sure you
# understand what are you trying to accomplish and the consequences.
#
# The primary way of configuring a node is via this file. This template lists
# the most important settings you may want to configure for a production cluster.
#
# Please consult the documentation for further information on configuration options:
# https://www.elastic.co/guide/en/elasticsearch/reference/index.html
#
# ---------------------------------- Cluster -----------------------------------
#
# Use a descriptive name for your cluster:
#
#cluster.name: my-application
#
# ------------------------------------ Node ------------------------------------
#
# Use a descriptive name for the node:
#
#node.name: node-1
#
# Add custom attributes to the node:
#
#node.attr.rack: r1
#
# ----------------------------------- Paths ------------------------------------
#
# Path to directory where to store the data (separate multiple locations by comma):
#
#path.data: /path/to/data
#
# Path to log files:
#
#path.logs: /path/to/logs
#
# ----------------------------------- Memory -----------------------------------
#
# Lock the memory on startup:
#
#bootstrap.memory_lock: true
#
# Make sure that the heap size is set to about half the memory available
# on the system and that the owner of the process is allowed to use this
# limit.
#
# Elasticsearch performs poorly when the system is swapping the memory.
#
# ---------------------------------- Network -----------------------------------
#
# Set the bind address to a specific IP (IPv4 or IPv6):
#
#network.host: 192.168.0.1
network.host: 0.0.0.0
# Set a custom port for HTTP:
#
#http.port: 9200
#
# For more information, consult the network module documentation.
#
# --------------------------------- Discovery ----------------------------------
#
# Pass an initial list of hosts to perform discovery when new node is started:
# The default list of hosts is ["127.0.0.1", "[::1]"]
#
#discovery.zen.ping.unicast.hosts: ["host1", "host2"]
#
# Prevent the "split brain" by configuring the majority of nodes (total number of master-eligible nodes / 2 + 1):
#
#discovery.zen.minimum_master_nodes: 3
#
# For more information, consult the zen discovery module documentation.
#
# ---------------------------------- Gateway -----------------------------------
#
# Block initial recovery after a full cluster restart until N nodes are started:
#
#gateway.recover_after_nodes: 3
#
# For more information, consult the gateway module documentation.
#
# ---------------------------------- Various -----------------------------------
#
# Require explicit names when deleting indices:
#
#action.destructive_requires_name: true
EOF
$ docker build -t [HOSTNAME]/[PROJECT-ID]/[IMAGE][:TAG] -f Dockerfile .
範例:
$ docker build -t us.gcr.io/my-project-id/elasticsearch:5.6.5v1.0.1 -f Dockerfile .
確認 docker images
$ docker images -a
REPOSITORY TAG IMAGE ID CREATED SIZE
us.gcr.io/my-project-id/elasticsearch 5.6.5v1.0.1 4004749175b3 2 hours ago 555MB
可參考官方教學,或使用 gcloud 指令開啟
$ gcloud services enable containerregistry.googleapis.com
可參考官方教學,上傳完成後即可在 GCP console 的 Container Registry 中看到 images
$ gcloud docker -- push [HOSTNAME]/[PROJECT-ID]/[IMAGE][:TAG]
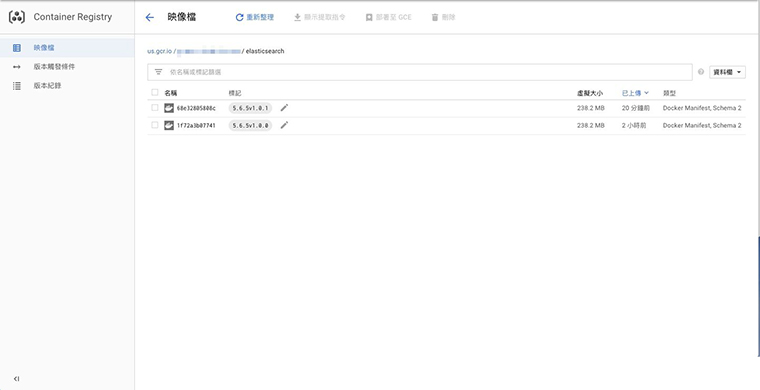
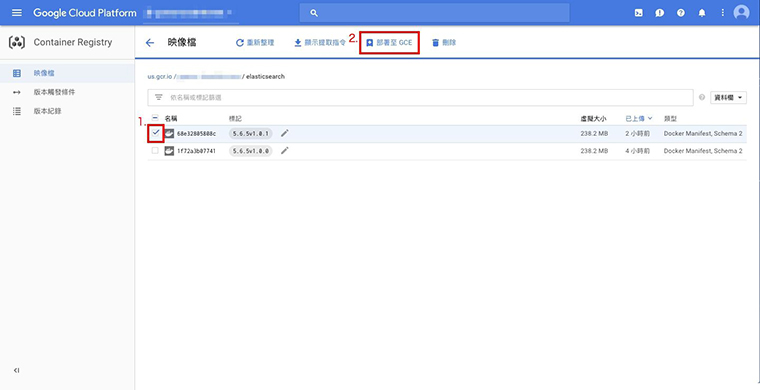
此部分可以從 Container Registry 或是 Compute Engine 頁面開始
主機目錄掛接項目 填入掛載的 data volume 路徑,讓資料能夠儲存在主機上而非 container 中
防火牆 需開啟 tcp:9200 (for RESTful API with JSON over HTTP)、tcp:9300 (for Java API),請參閱這
#!/bin/bash
$ sudo su -
$ echo 262144 > /proc/sys/vm/max_map_count
SSH 連線至 instance 內,執行以下指令建立主機路徑並修改權限
$ sudo chmod 777 /mnt/stateful_partition/elasticsearch/
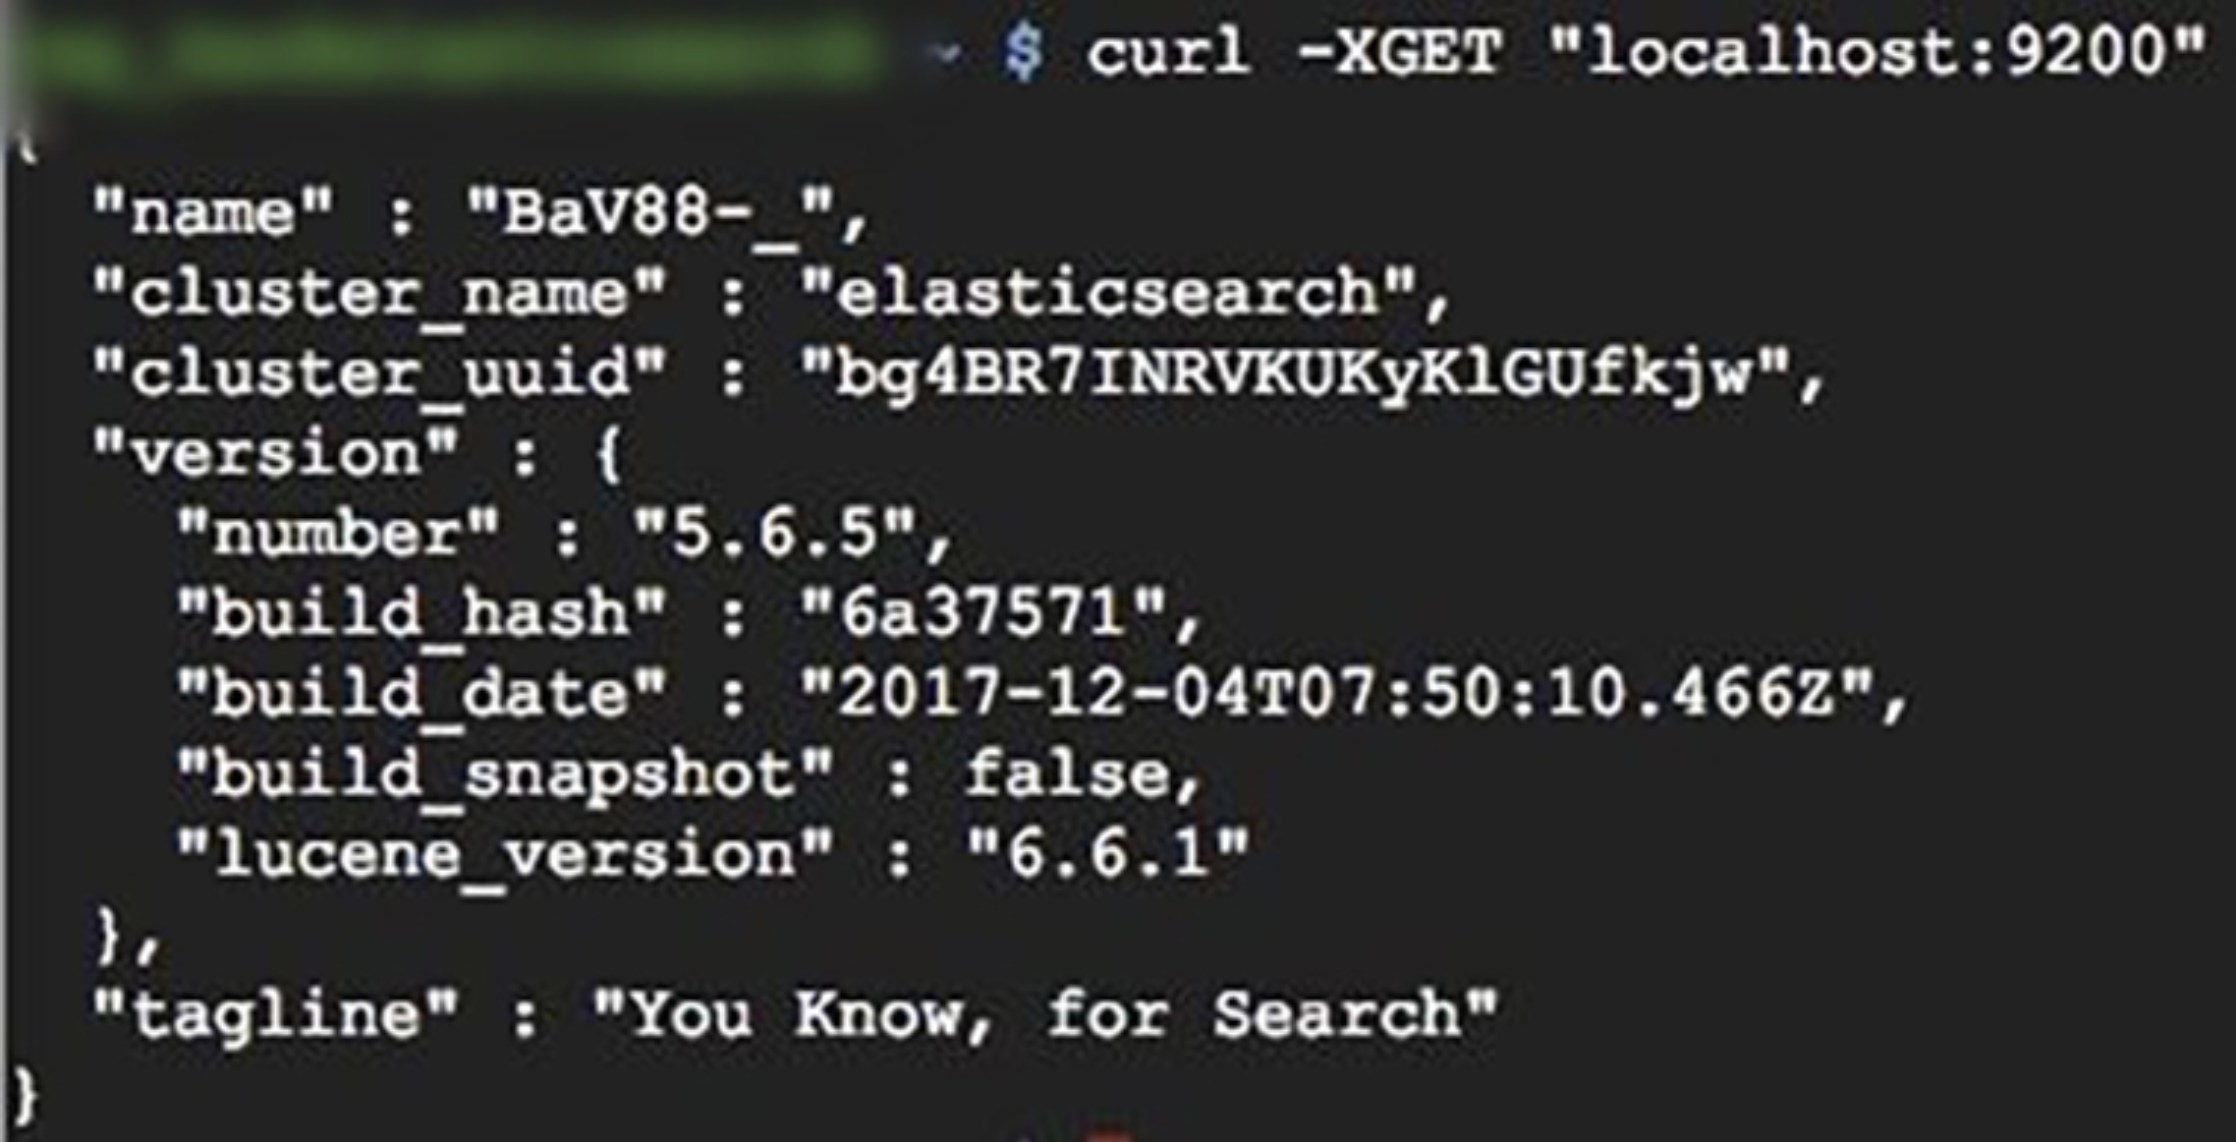
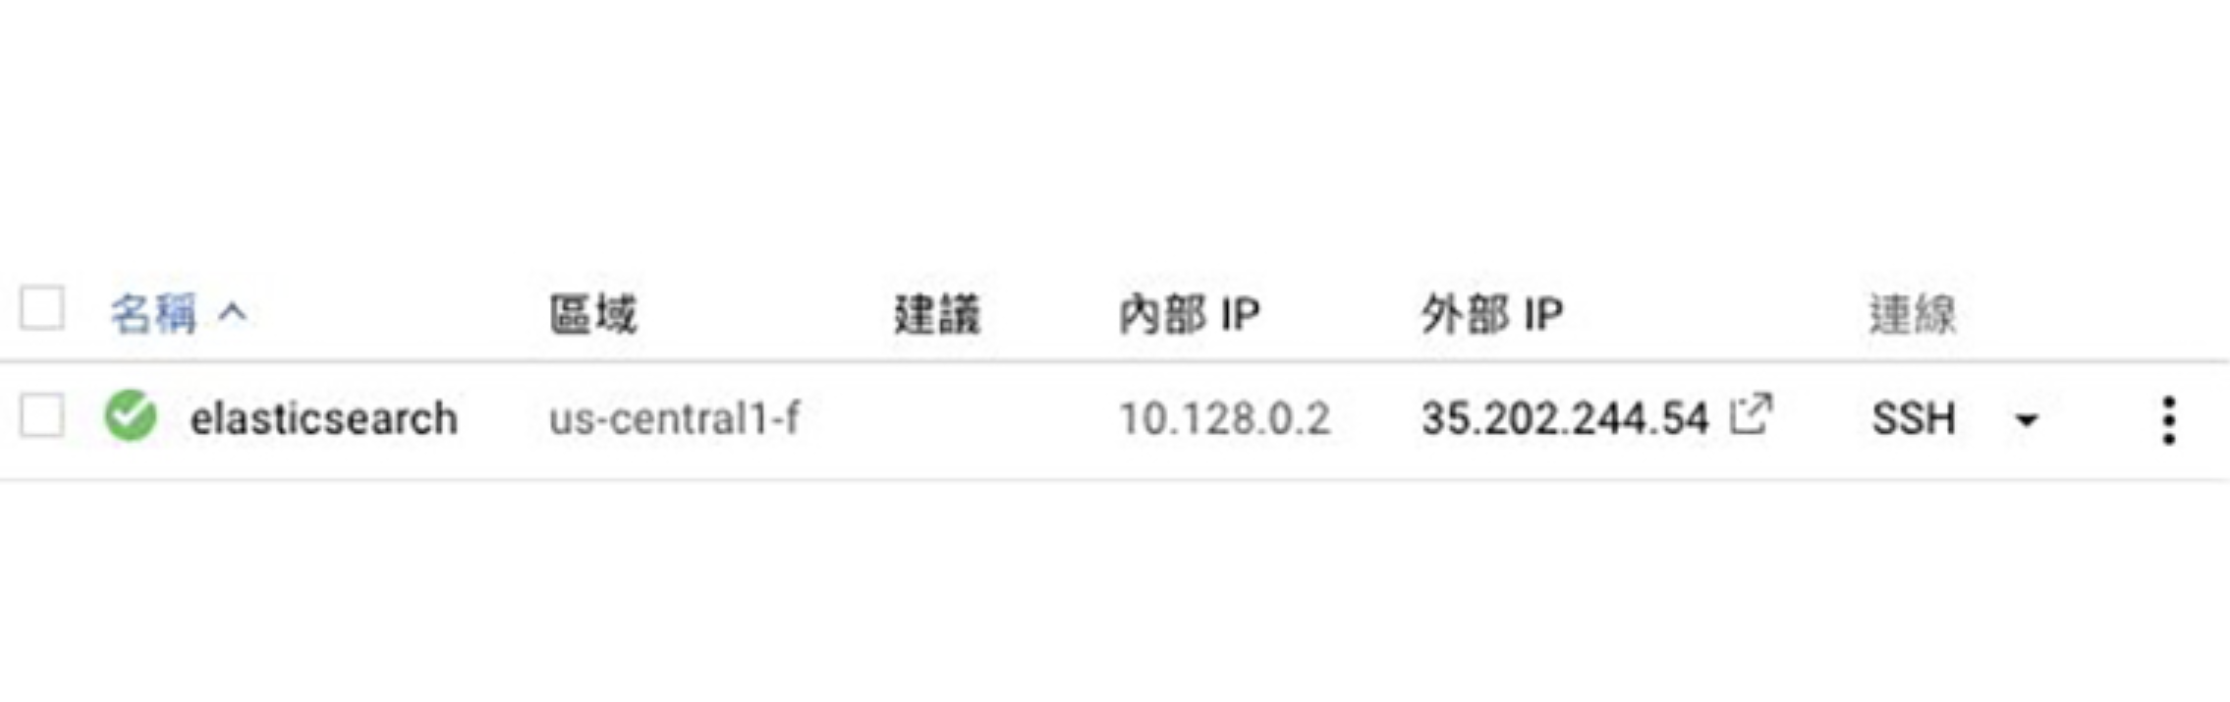
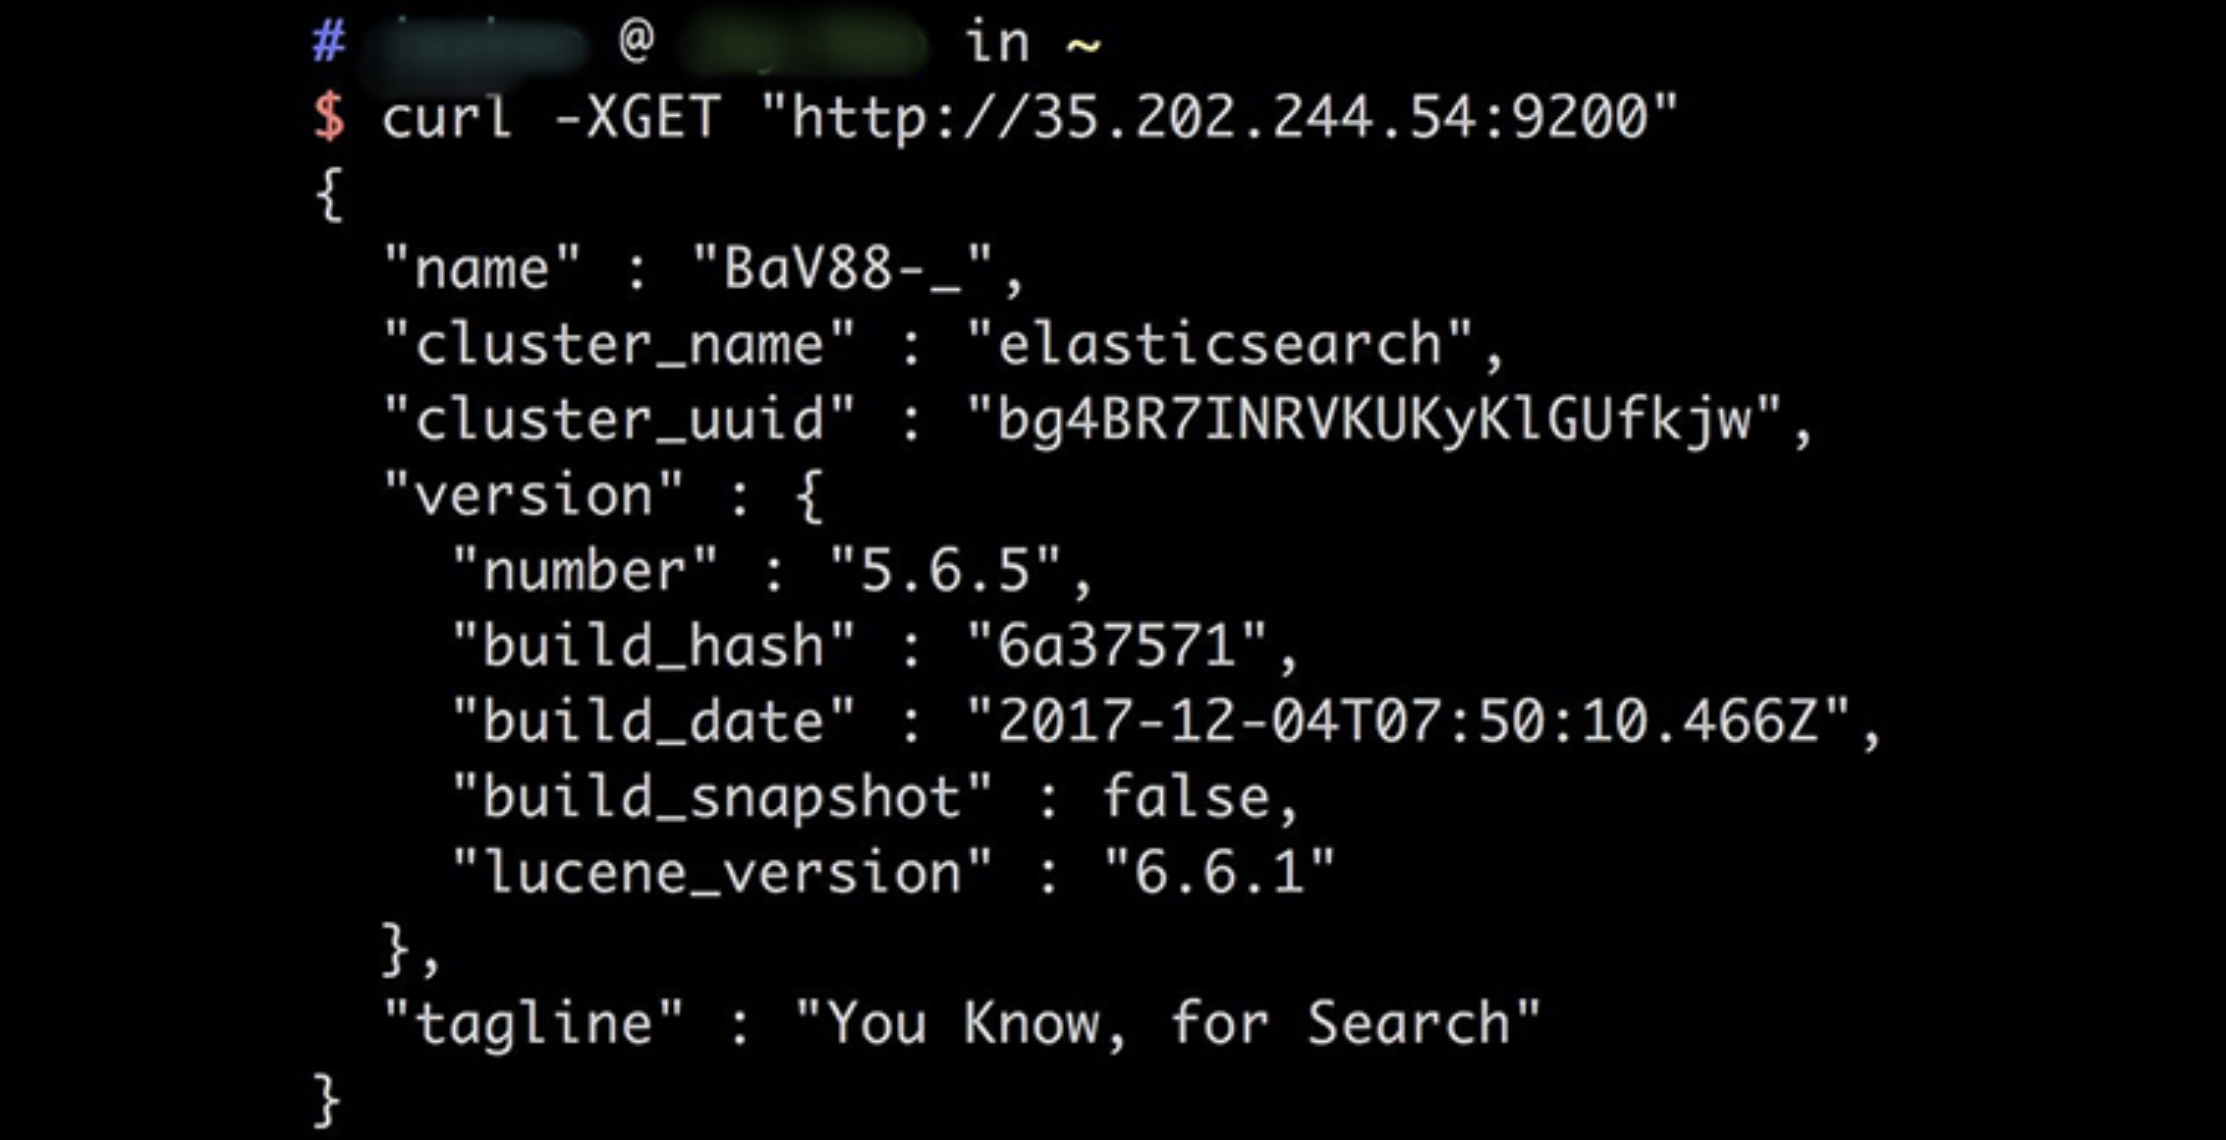
從外部進行連線測試
Contact CloudMile
Contact Us
Proven Experience Across Diverse Industries
Phone Number
Reason for Inquiry
Electrum Advisory
MileInfra - Cloud Infrastructure Modernization
Enterprise Technical Training
MileSec - Multi-Cloud Security and Operations
MileData - Cloud Data Management and Automation
MileOps - Hybrid and Multi-Cloud Operations
MileAI - Generative AI Applications and Innovation
LumiTure.ai AI-Powered FinOps Platform
Other
Confirm and Return
2026
JAN
09
【GCP手把手教學】VM 日常維運篇 Patch Update
2026
JAN
09
快速攻略混合多雲管理平台 Anthos,實踐現代化應用程式的開發與部署
2026
JAN
09
什麼是 Agentic AI?五分鐘了解集自主決策、規劃、執行能力於一身的 AI 助手
2026
JAN
09
【GCP教學】如何設計安全且可靠的架構來連接混合雲與多雲環境
2026
JAN
08
【GCP 教學文】三分鐘在 GCE 上部署 Container
2026
JAN
08
Model Context Protocol(MCP)是什麼?讓 AI 助理從「說」到「做」
2026
JAN
07
什麼是 MSSP?企業資安外包的關鍵解方與雲端資安的未來
2026
JAN
05
Agent2Agent(A2A)協議深度解析:企業如何整合 AI 代理服務、打破系統孤島?
2026
JAN
05
Model Context Protocol(MCP)是什麼?讓 AI 助理從「說」到「做」
If you wish to unsubscribe, please click: Unsubscribe from Newsletter
Confirm and Return
Confirm and Return